12 December
Fixing Shadow Noise in Unreal Engine 5 – a Guideline with Practical Tips for Lumen and Ray Tracing
3D
Design
min. read
Introduction
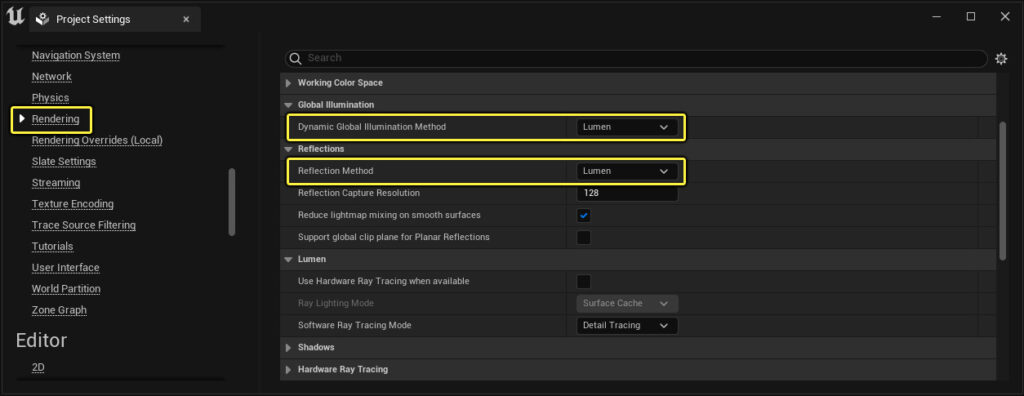
Working with advanced features of game engines can lead to many challenges and cause some issues connected to specific functions. Game developers and other visual creators (e.g., Archviz artists) can use the Lumen technology for a while now. This fully dynamic global illumination system immediately responds to scene and light changes. This feature is a game-changer. However, it’s worth mentioning also the Ray tracing method, which is simultaneously used depending on the artists’ needs.
Like any other technology, Lumen and Ray tracing itself have performance and technical issues that are not only caused by their limitations. So, today, we will focus on some nuances connected to both methods. This article will provide practical tips for overcoming hitches connected to shadow noises appearing when working with the light.
We will also touch on a related subject, like essential settings in the engine. Let’s check out how to utilize Lumen and Ray tracing technology effectively in Unreal Engine 5 and eliminate noises.
What can Lumen do?
- Real-time indirect lighting with amazing accuracy
- Providing reflections and integrating global illumination into the reflections
- Supports clear coat reflections (2 reflections instead of 1)
- Fully shadowed skylight (provides a dynamic GI and sky shadowing on translucency and volumetric fog
How does Lumen work?
Lumen is a hybrid Ray tracing pipeline that uses Ray tracing software. It traces against the depth buffer first, which we call screen traces. Then, it traces against distance fields and applies lighting with a surface cache. Lumen relies heavily on mesh distance fields, which were rewritten in UE 5. Now they are streamed from disk, have half the memory cost, mipmaps, and build 10x faster.
The surface cache splits up meshes with a bunch of cards. It captures material properties of the mesh, color, and roughness at very low resolution into an atlas, which works exceptionally well with Nanite meshes.
Lumen Card Placement
Due to how surface cache works, it’s better to use separated objects. You can enable Lumen cards view to see how they are applied in your scene. It’s best to use modular thick walls to get the best results. Still, modular single-plane meshes should also give good results with the console command: r.lumen.visualize.cardplacement 1, you can visualize.
Unwrapping – properly unwrapped objects might also affect the quality of the Lumen. Uniformly scaled UVs make it easier to apply materials inside Unreal Engine properly.

The quality of shadows in a rendered scene
You probably faced some problems with shadows on the meshes or noticed something was wrong with the shadowing in your project. Identifying the reasons for such hitches can significantly improve the efficiency of the work.
Lumen Shadow Noise is essentially pixelated or grainy shadows in a rendered scene. Low resolution, incorrect light settings, or insufficient sampling can cause this problem. Such noise can downgrade the quality of your scene, making it look unrealistic and visually unsatisfying.
Some actions which can help to solve Lumen Shadow Noise:
- Increase the screen percentage
The screen percentage is strictly related to the resolution of your scene. An increased screen percentage leads to a higher resolution, which can significantly reduce shadow noise. Navigate to ‘Project Settings > Engine > Rendering > Default Settings > Screen Percentage’ and increase the value. However, be aware that, on the other hand, this might affect your performance, so find a balance that suits your needs.
- Adjust light settings
The settings of your light sources can strongly affect the appearance of shadows. Ensure that your light sources have appropriate settings for your scene. For instance, increase the ‘Static Lighting Resolution’ in the light settings for static lights or increase ‘Ray Tracing Samples per Pixel’ for ray-traced lights.
- Use Temporal Anti-Aliasing (TAA)
TAA can help reduce the noise in renders. This technique works by taking multiple samples over time and combining them to create a final image. You can enable TAA in ‘Project Settings > Engine > Rendering > Default Settings > Anti-Aliasing Method’ and select ‘Temporal AA.’
- Increase samples for Lumen
Lumen’s quality can be improved by increasing the number of samples it uses. Go to ‘Project Settings > Engine > Rendering > Lumen > Samples per Pixel’ and increase the value. More samples lead to better shadow quality but can also impact performance.
- Control shadow bias
Shadow bias is a parameter that allows you to adjust the offset of shadow maps from the light source. A slight adjustment can help remove shadow noise. However, excessively high bias values can lead to Peter-Panning – a phenomenon where the shadow seems disconnected from the object casting it.
Let’s skip to some examples for Ray tracing
Assume that we have gnarly shadows scattered over the scene, and it seems like it’s the way Nanite works with ray-traced shadows. For this situation, we may apply 3 techniques to fix it.
- DISABLE RAY-TRACED SHADOWS ON THE LIGHT
Go to the details panel and type “ray” in the search button. Then, choose “use project settings” for Cast Ray-traced shadows.
2. SET THE CONSOLE VARIABLE TO 0
You may need to have ray-traced shadows in the lights. In that case, go to the console command menu and use the console command r.RayTracing.Shadows.Enabled.TwoSidedGeometry 0. By default, it’s set to 1, but changing it to 0 helps us to preserve ray shadows and remove all splotches.
Remember that if you have some one-sided meshes in such a scene, you will realize that it’s no further casting shadows. If you change the two-sided geometry again back to 1, you will see that casting shadow is performing again. Nevertheless, change it to 0 because it will cast shadows if you rotate the mesh 180° with such settings. The reason is that ray-traced shadows don’t trace against the actual Nanite geometry when using Nanite. Ray-traced shadows trace against Nanite fallback mesh (previously Nanite proxy mesh).
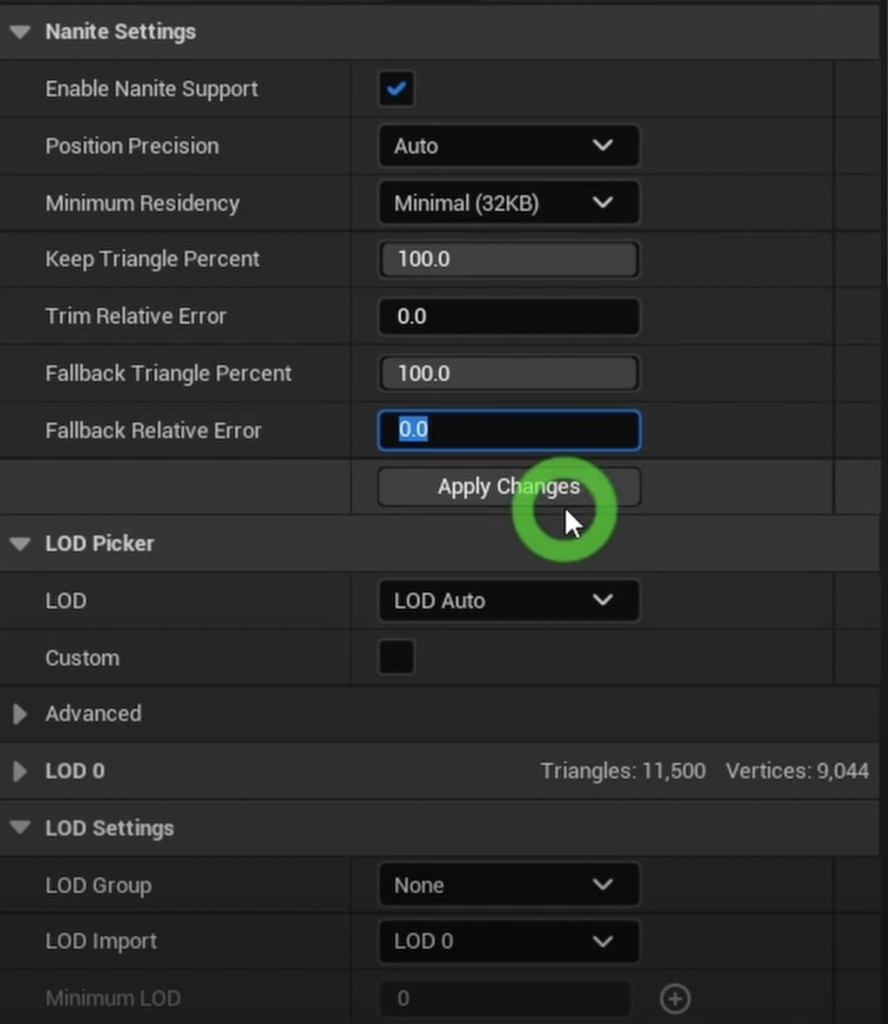
3. SET THE FALLBACK RELATIVE ERROR TO 0 + APPLY IN THE STATIC MESH EDITOR OF THE NANITE MESH
To discuss the third solution, we should change the settings in the console command back to 1 again. Now, we have the shadows cast by one-sided geo.
The last solution is to select the Nanite mesh and open the static mesh editor. Then go to the “show” button and choose “Nanite fallback.” You will see that it’s different – more polygonal, but when turning it off, we can see a Nanite mesh. This gives us noisy shadows; the fallback mesh casts clouds because the shape is different. So, we are going to the “fallback relative error” in the Nanite settings of the static mesh editor, change a value to 0, and click “apply changes.”
Note that this impacts your scene, so we must wait a bit. When it’s ready, check out Fallback and Nanite mesh – they look almost the same. It will be mesh-dependent if it performs perfectly or less perfectly, but let’s try if you want to have two-sided shadows and keep ray-traced shadows.
Summing up the above actions, the reason why these shadows noise appear is that ray-traced shadows are traced against the Nanite fallback mesh, not the Nanite mesh itself.
Other essential tips for Lumen
- Lumen – Shadow Noise
You can use different console commands to increase the quality of shadows.
Console command for Shadows:
- Reducing Noise: r.Shadow.Virtual.SMRT.RayCountLocal 8
- Soften Shadows: r.Shadow.Virtual.SMRT.SamplesPerRayLocal 8


2. Lumen – to dark or light
- Base Color is super important for GI, don’t use value of 1 or 0.
- Use Lumen Scene to check if it roughly looks the same as what you see in LIT mode. Black objects are only using screen space.

3. Materials washed out
First, set up your scene lighting to give it the desired result. After that, use post-process volume to do only minor tweaks. You can use a sun lighting intensity of 10 lux as a default.
4. Sky – fast and easy
You can use the Ultra Dynamic Sky plugin for UE 5 for quick, easy, beautiful dynamic skies.

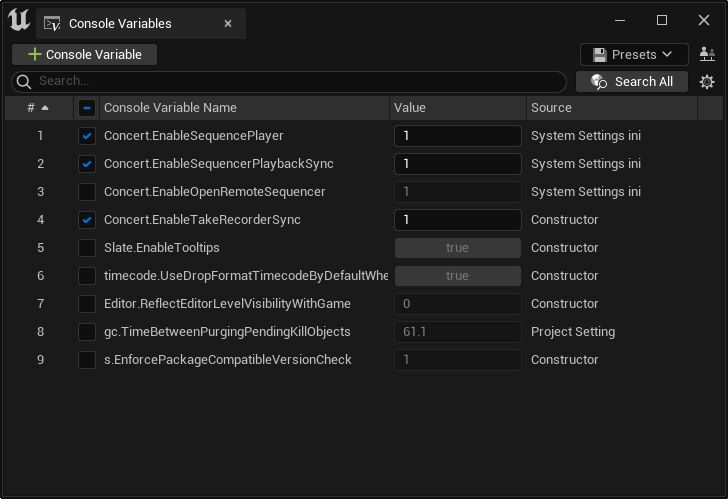
5. Console Variable Editor
There is an excellent tool in UE5 for saving and editing variables.
6. Blinds – material
There is an AntiAliasing problem with thin meshes. The best fix in terms of performance and quality would be to use material on a plane that will fake the 3D mesh like this.
Lumen vs Ray tracing – conclusions
We’ve gone through some mostly appearing Lumen and Ray Tracing issues. Each technology has challenges like shadow noises; several techniques can be used to solve these issues. Changing settings like screen percentage, light settings, and shadow bias, using Temporal Anti-Aliasing, and increasing Lumen samples can help to reduce shadow noise.
For Ray tracing, disabling ray-traced shadows on the light, setting the console variable to 0, or changing the fallback relative error can improve the quality of shadows. Moreover, using the console variable editor, adjusting the base color for GI, and using the Ultra Dynamic Sky plugin can further optimize your scene. By understanding these methods and applying them effectively, you can create visually stunning projects completed with realistic lighting in Unreal Engine 5.


About prog
Founded in 2016 in Warsaw, Poland. Prographers mission is to help the world put the sofware to work in new ways, through the delivery of custom tailored 3D and web applications to match the needs of the customers.
SIMILAR POSTS
How to Achieve CG Photorealism – Basics & Tips
3D
Design
min. read
Deploying Nginx as an API Gateway – Tips & Functionalities
Programming
Web apps
min. read
8 UI/UX Best Practices for the Successful Performance of the Website
Design
Web apps
min. read
Let's talk
I agree that my data in this form will be sent to [email protected] and will be read by human beings. We will answer you as soon as possible. If you sent this form by mistake or want to remove your data, you can let us know by sending an email to [email protected]. We will never send you any spam or share your data with third parties.
I agree that my data in this form will be sent to [email protected] and will be read by human beings. We will answer you as soon as possible. If you sent this form by mistake or want to remove your data, you can let us know by sending an email to [email protected]. We will never send you any spam or share your data with third parties.