1 March
How to Achieve CG Photorealism – Basics & Tips
3D
Design
min. read
Introduction
It would not be an exaggeration to say that achieving photorealism is a most demanded skill in a 3D environment. Also, making more photorealistic renders using all the possibilities hidden in the software settings and running more advanced actions is challenging.
Nowadays, CG images are often the only way to achieve visuals by setting goals, especially in architectural visualizations or movie scenes that are impossible to arrange in the real world. Games are a leading branch where CGI is used, but more and more industries demand such technology year after year.
Let’s discuss critical principles that guide photorealism, the basics to achieve it, and some helpful tips for work.
The 4 components of photorealistic image
When discussing the basics of achieving photorealism, we should start imagining a pyramid in which, at a base level, we can put modeling perceived as a foundation. Then, we have materials, lighting, and post-processing.
Modeling
Photorealistic modeling is matching the proportions and form of real-world objects. It’s the most crucial part because everything else in the project will become unsuitable when it’s done wrong.
Some tips:
- Remember to use the natural world scale. Don’t rely on your ideas about space. Instead, check measurements via Google – for example, the average height of things.
- Don’t use sharp edges. There is no such thing as a 90-degree real world, the edge. At first glance, we can perceive things as that sharp, but when we approach microscopically, we see that even the sharpest objects have some smoothness. Use a bevel tool to round your corners – it will also ensure catching a light by those edges. It significantly improves the realism of the scene.
- Use real-world references. Remember that using real-world references of the objects is priceless – it also applies to the less important things. You can find some references on the internet. Still, not everything will be adequately photographed, and it mainly refers to objects like a door hinge, pipes, etc. – the best option is to find such a thing in the real world or look at it if it’s available in your house. Watching things from a different angle will help you model it.
- Know the anatomy. This tip will be crucial for those working mainly with characters. Pay attention to learning anatomy if you want your characters to look realistic and reliable. It will prevent anatomical mistakes, which are very common when you don’t know how a natural person’s muscles or bones are distributed in the body.
Lighting
Understanding light as a fundamental part of creating 3D visuals includes various concepts. In general, creating photorealistic lighting prepares light that matches the color, direction, and intensity known from the real world.
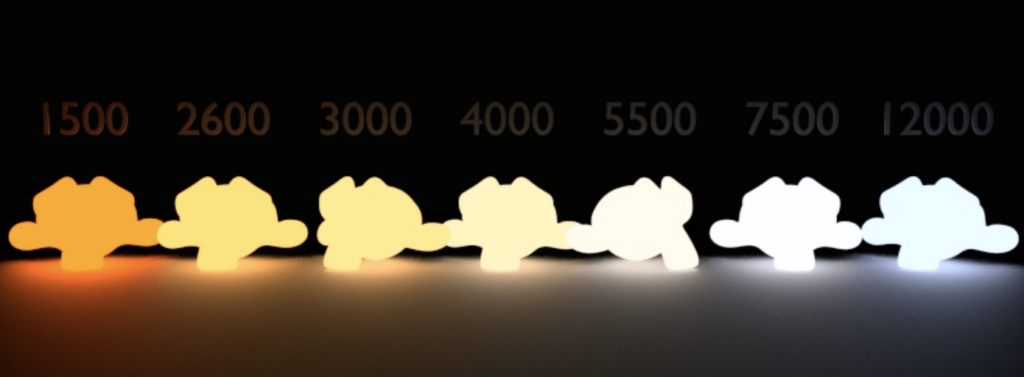
Light color
As a basic rule of thumb, most real-world lights fall within a Kelvin Scale.
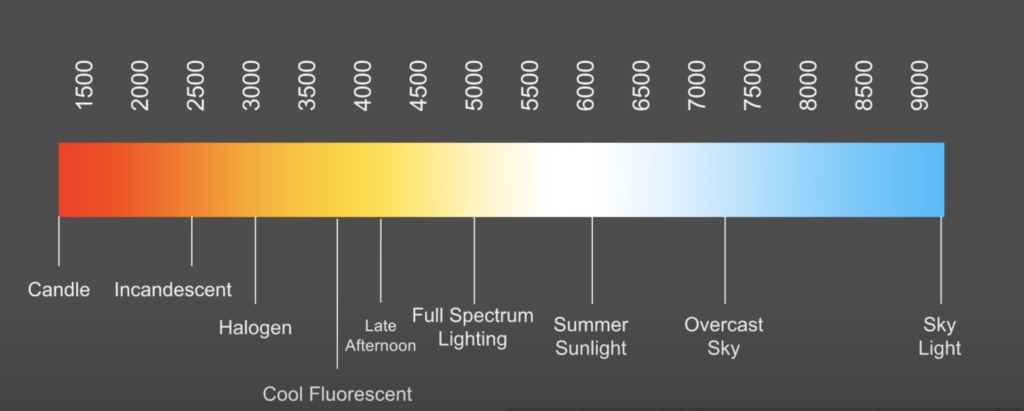
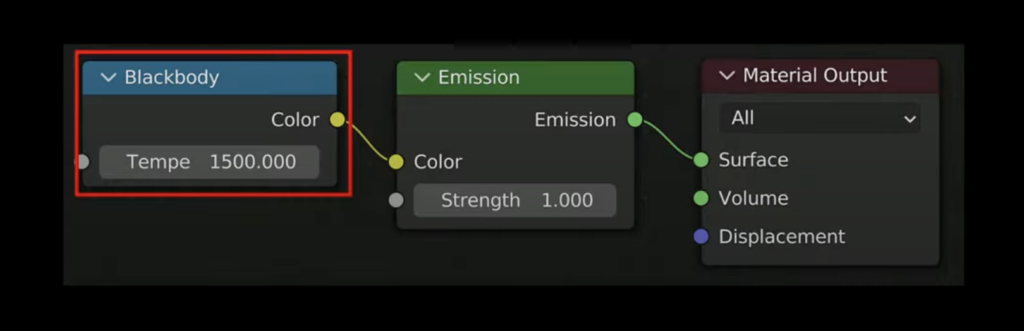
In Blender, for example, we can add a Blackbody node and change value from the scale. This node converts blackbody temperature into RGB value, which is very useful for materials emitting light at natural frequencies.
Light falloff
This feature is relatively undervalued but plays a huge role. Understanding it starts when we realize how the light falls off the objects and how it looks regarding percentage scattering.
This is where the Inverse Square Law comes into action. It expresses how the intensity of light diminishes with increasing distance from its source.
This law says that light’s intensity (or brightness) is inversely proportional to the square of the distance from the source. In simple terms, if you double the distance from the light source, the brightness will be reduced to a quarter of its original intensity. Similarly, triple the distance will reduce the brightness to a ninth of its initial intensity.
Remember that:
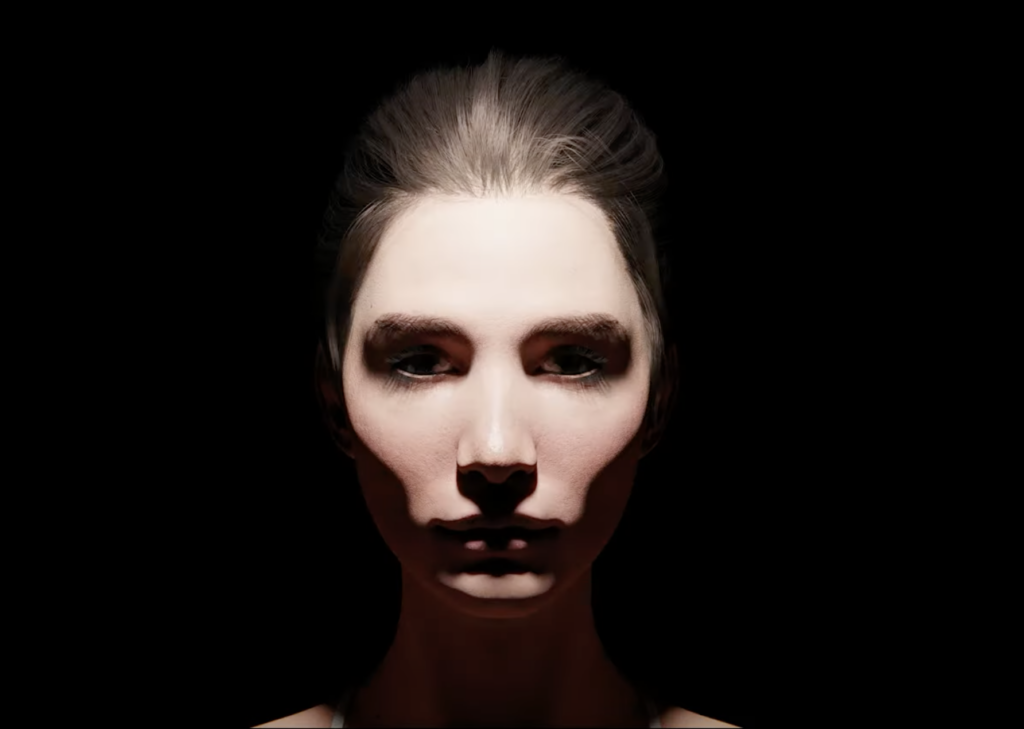
- The light intensity falls sharply from the point where it originates, but the further away, there is less falloff.
- The smaller the light source, the sharper the shadow is, and the deeper such shadow become.

Some tips:
- Use accurate light directions. It’s worth imitating actual light behavior, even if we have a scene where a character stands in the room but we don’t see a window. A helpful task for this will be modeling that window so the light can stream through it. The light is tricky when creating CG visuals. There are a lot of nuances that the human eye can’t notice, so paying attention to such details as directions will be a game-changer.
- Use the correct color. This rule relates to the Kelvin scale described above.
- Don’t forget about reflections. When creating 3D visuals, it’s easy to focus on what’s in front of the camera and forget what’s behind it. Every object has some amount of reflectivity, and beneficial technology here is an HDR environment light with 360-degree photos that can power the scene’s light. Instead of figuring out how to set up reflections, you use one HDR, and then you don’t need to add any lights to your scene.
Materials
Photorealistic materials are when the shading and textures match authentic materials.
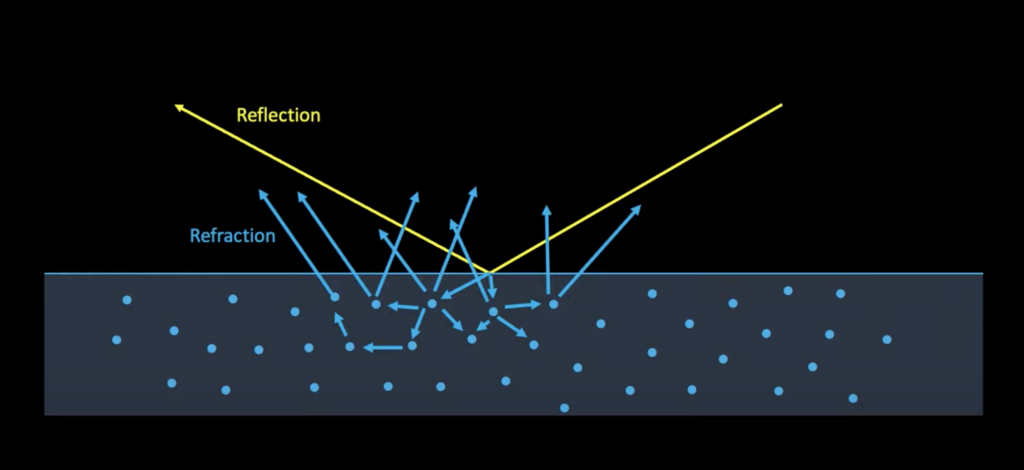
When light hits a material, some things happen. First, a portion of the light is reflected, and we are aware that it’s a reflection because when we move our heads left and right, we can also recognize light moves. Part of the remaining light is absorbed – it goes into the material, hits some particles, then bounces off those hits, hits some more particles, and then some of that exits the material. This is called refraction or diffuse.
Remember that:
- There is no such thing as reflective and non-reflective objects.
- Most objects reflect the same amount, but the critical value is here a sharpness of the reflection that differs (depending on the roughness of the objects)
- On a very smooth surface, the reflection bounces off in mostly the same direction it was received.
- On a rough surface, bounces are going every way (the reflection is so smooth that we don’t even see it)
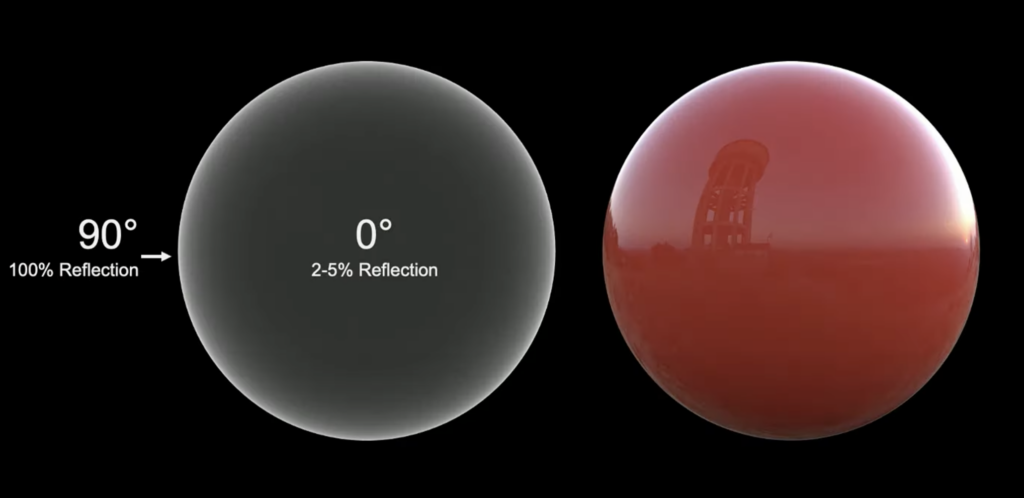
Another interesting fact about reflection is that it is not uniform across it. There is a thing like a fresnel*, so an object’s edges always reflect 100% roughly.
*Fresnel Effect – the observation that the amount of reflectance you see on a surface depends on the viewing angle.
Some tips:
- Use physically accurate shaders. If you use Cycles, you know it doesn’t work by default. Renderers like Octane, Arnold, or Maxwell have physically correct shaders automatically. So keep in mind that tuning up realistic shaders in Blender will lead to photorealistic images. Take into account that fresnel is affected by the roughness of the gloss. Also, be careful when dealing with mixed shaders – it won’t have the fresnel. While using principal shade, it will also adjust the fresnel depending on how rough the object is.
- Remember about surface imperfections. Every surface in the real world has some form of imperfections, even a kind of dust or different ashes or sun fading.
Metals & non-metals
- Metals are pure reflection. In the scheme below, that part of reflection where it enters into the object does not refract any of that light. On the other hand, some of the light is absorbed into it, but that is transferred as heat. This is why you see reflective information when looking at a metallic object – there is no color or diffuse information there.
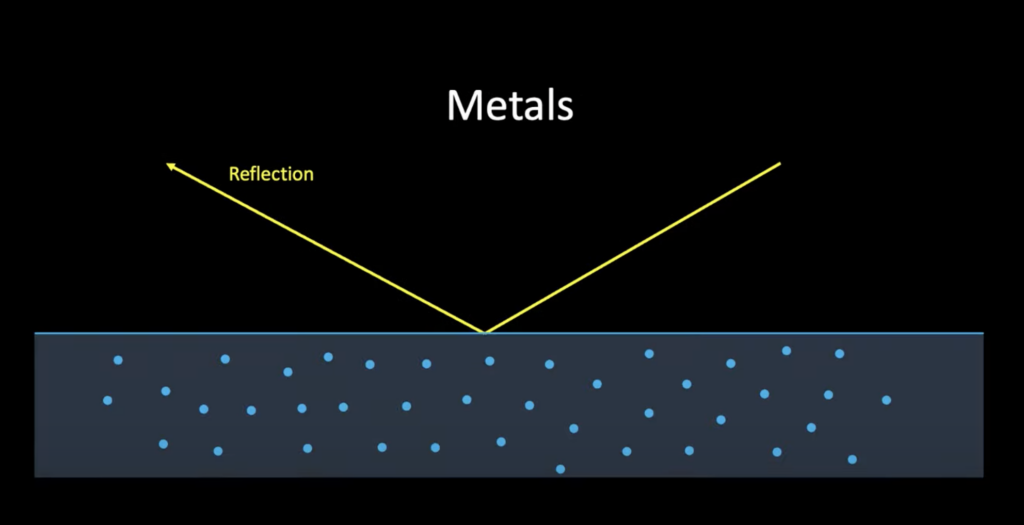
- Metals are the only materials that will tint a reflection. The tint will weaken with fresnel, so it will also weaken towards the edges of metallic objects. Besides metals, any other objects will reflect the color of the source lamp.
Variance
Every object has different amounts of layering on it. A great tip for working with materials is to play with roughness (noise texture). Adding variance across the surface brings much more realistic light to a material. Then, you can plug that into color information and bump information. These actions provide a more complex and natural effect of the material.
Another important thing is working with PBR maps. When you take an image texture and put it into 3D software, the software doesn’t know how to act with this material – it doesn’t know where the bumps are or where there is more or less reflection. PBR maps are separate images that go with that image texture, and thanks to them, the software has more information about the textures.
Texture sets are designed to go together – the color information matches the gloss and bump information.
Optics
Optics is about emulating what the camera sees. The most essential part to understand is the concept of exposure, which can be explained based on an exposure triangle, which shows that this value results from 3 settings in a camera. In CGI, we have a virtual camera, but understanding this triangle is crucial for exposure manipulation.
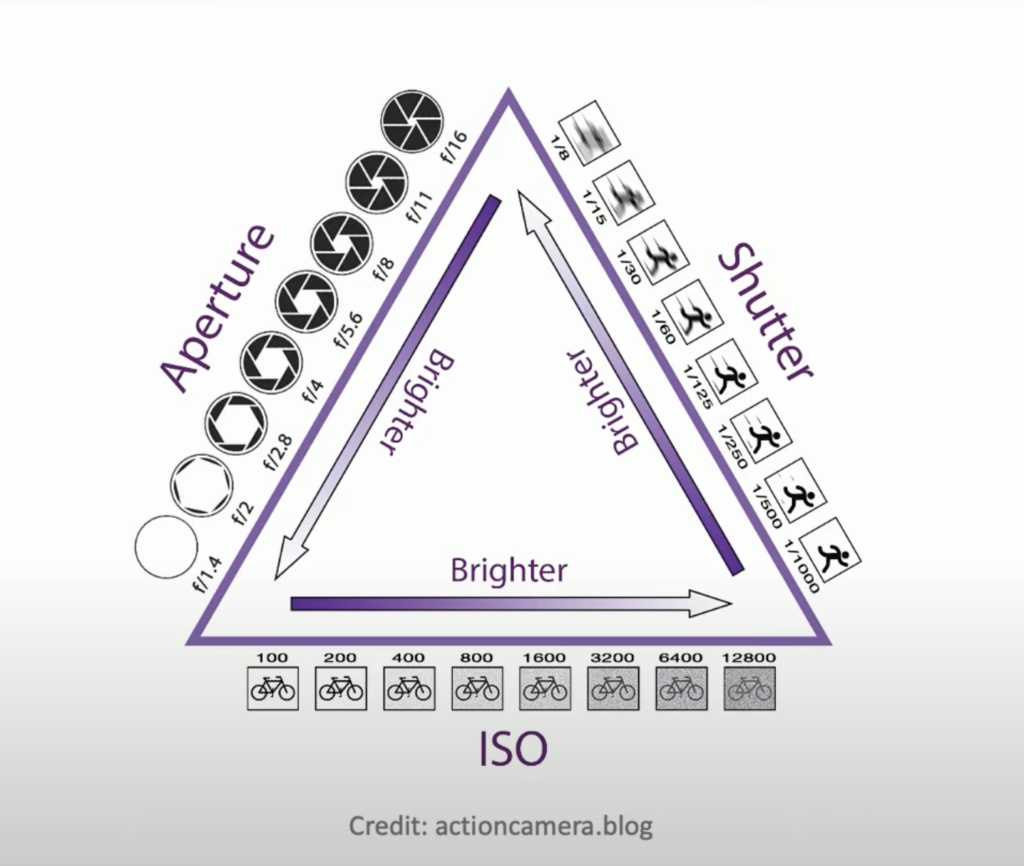
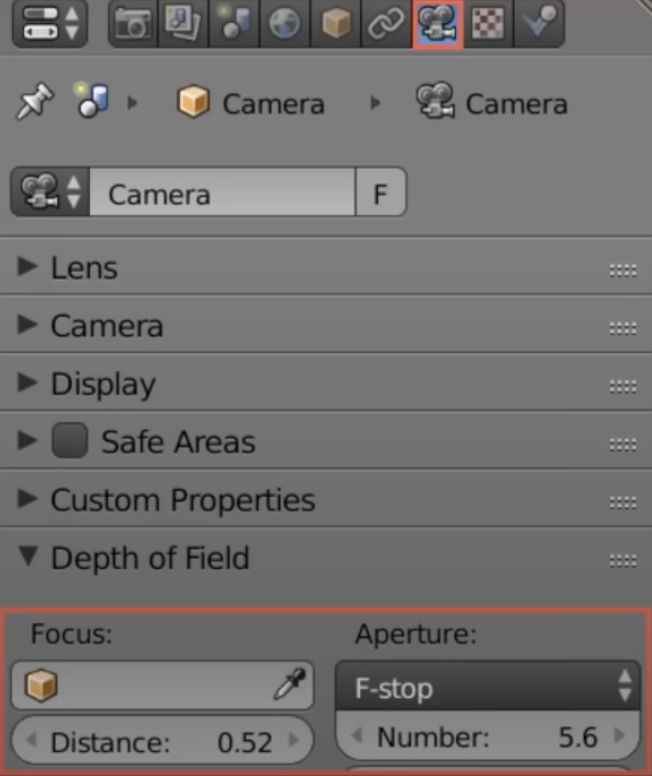
- Aperture
If you want more light in your lens when photographing, you will use a lower aperture, which will also increase the depth of field. Such a procedure can also be quickly done in Blender – you should select a camera, turn on the depth of field, select the object you want to be in focus, and only adjust the F-stop. Also, when dealing with a tiny scene like a miniature, the depth of field is more significant, whereas working with a larger scene leads to an almost imperceptible depth of field. Using a correct, real-world scale for a scene ensures excellent rendering.
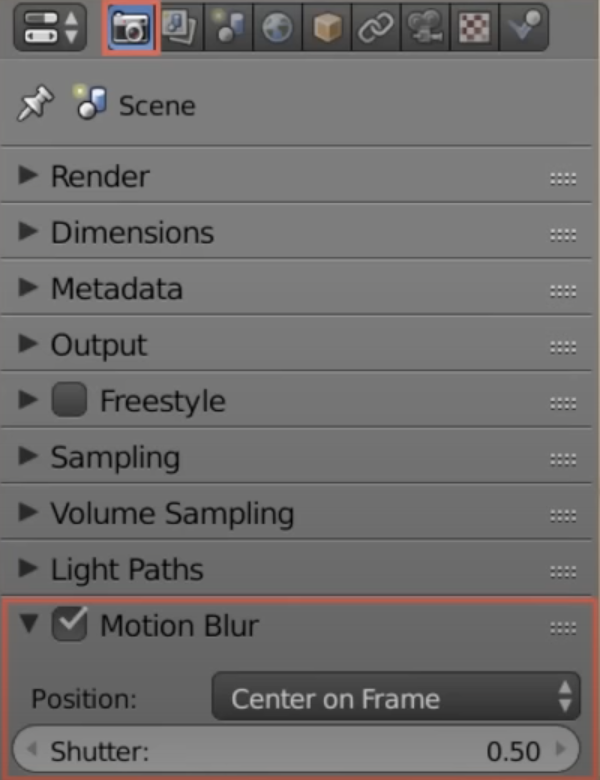
- Shutter speed.
In photography, the longer a shutter speed is open, the more light will hit the lens, but the more motion blur in the scene. In Blender, we can turn on a “motion blur” setting, and then you have a shutter value there. Also, there will be a higher motion blur when you need more light to hit the lens, so a daytime scene would generally be less motion-blurred than a nighttime one.
- Grain
The higher the ISO is, the more light is forced into the sensor, so it’s a speedy way to get more light, but unfortunately, it also gets more noise with such action. Worth mentioning is that we can separate noises into two categories: digital and film. Digital noise is colored, pixel-sized, and uneven, while film noise is more grayscale, has varying sizes, and is more uniform.
The grain or noise of a path trace render engine is entirely different from film or camera noise. Try to render out as many samples as possible, cleaning up the shot with denoising and then adding grain over the top, which you can do in Photoshop.
Post-processing
Post-processing is all about recreating imperfections from real-life cameras. We can distinguish five prominent imperfections when it comes to cameras in general. Knowing the basics of photography is helpful for CGI artists because it ensures the right feelings about those imperfections and adjusting them.
- Light glare
Lens flares occur in every photo whenever there is a bright light source against something dark. It’s caused by light entering the lens and scattering inside it. This happens when the camera is pointed towards a bright light source, like the sun or a lamp. The light bounces around within the lens, reflecting off elements and surfaces inside, and eventually reaches the image sensor. This light scattering creates bright circles or polygons, streaks, and a general haze over the image, collectively known as lens flare.
Such a light glare won’t occur by default when rendering, but it’s pretty easy to add in the Compositor, where you can add a glare node. If we don’t do it, an image will appear to be a CG. So go to the Compositor and ensure your light source is isolated. The glare node can reduce the threshold using a threshold value.
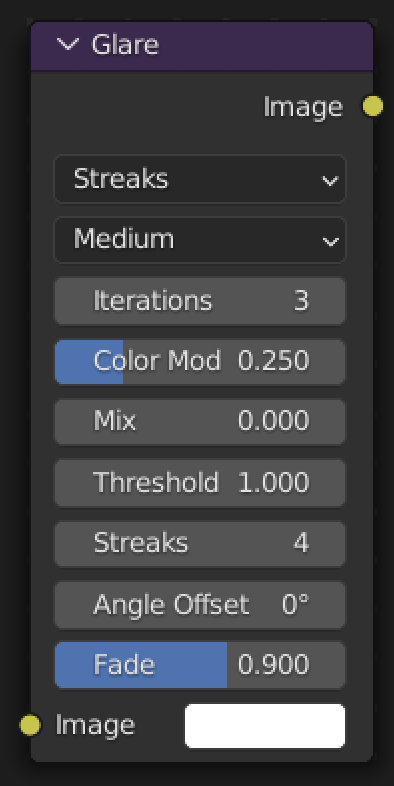
You can plug in your render there and then define the threshold. If your scene has various light sources, for example, a few lamps, it will be great to give them a separate object index and put that index to another object index node, put that into a glare, and then you will have an actual natural lamp source.
- Motion blur
Similar to the previous point, knowing the basics of photography will help you figure out when to use motion blur. In low-lighting situations, that effect is most apparent because the shutter needs to be open longer to capture the light of the particular scene. Adjusting it in a tiny amount to the scenes is more realistic than avoiding it entirely.
- Depth of field
There is no possibility that a shot can be 100% focused on each element. This is why, if you use Blender, you should have a depth of field option for any render. You should go to the camera box panel and click below on the focus. Then you can click somewhere on the object where you want to have a focus and set the f-stop for 5.6 (great range for portraits and more minor things is 3-5.6, but for the cities, 11 will be good, or landscapes, 24).
- Color grading
Color grading in post-processing significantly influences the way the image will be perceived. It involves altering and enhancing the colors of an image to achieve a desired aesthetic or mood. This process aims to control color balance, contrast, brightness, saturation, and hue precisely. It also ensures the creation of a consistent style for images, emphasizing particular emotions or highlighting significant elements in a scene.
Conclusions
We’ve gone through the crucial points leading to the best creation of CGI. If you follow the rules described, you will certainly see that your images look better than before. The rest of the work constantly refers to real-world objects/locations/characters, etc.
However, remember that when you’re gathering experience, it also includes a lot of mistakes, thanks to which another time you can see what to improve and the fact is – that over time and with more experience, you will start to notice what other people overlook.


About prog
Founded in 2016 in Warsaw, Poland. Prographers mission is to help the world put the sofware to work in new ways, through the delivery of custom tailored 3D and web applications to match the needs of the customers.
SIMILAR POSTS
Deploying Nginx as an API Gateway – Tips & Functionalities
Programming
Web apps
min. read
8 UI/UX Best Practices for the Successful Performance of the Website
Design
Web apps
min. read
Fixing Shadow Noise in Unreal Engine 5 – a Guideline with Practical Tips for Lumen and Ray Tracing
3D
Design
min. read
Let's talk
I agree that my data in this form will be sent to [email protected] and will be read by human beings. We will answer you as soon as possible. If you sent this form by mistake or want to remove your data, you can let us know by sending an email to [email protected]. We will never send you any spam or share your data with third parties.
I agree that my data in this form will be sent to [email protected] and will be read by human beings. We will answer you as soon as possible. If you sent this form by mistake or want to remove your data, you can let us know by sending an email to [email protected]. We will never send you any spam or share your data with third parties.