7 August
8 Tools for 3D Rendering in a Web Browser
3D
Design
Programming
Web apps
min. read
Introduction
3D rendering using JavaScript and based on this language libraries/frameworks generally describes the process of creating an image based on three-dimensional data stored within a computer. Such a process involves the conversion of this 3D into a 2D image, which can be viewed on a screen. To make it possible, with help come calculations and algorithms that determine how different objects interact with light. What benefits does 3D rendering bring and what exactly does it ensure?
In this article, we’ll explain it by exploring the crucial intersection of 3D rendering process and JavaScript – elements that are fundamentally changing the environment of web development and design. Also we will mention some tools and libraries which are useful to render images and technically go through 3D rendering with one of the most know libraries – Three.js.
Understanding the basics of 3D rendering
The basic process of 3D rendering entails creating a scene, adding realistic lighting, creating materials and objects. Once all of these elements are configured, animation can be added as needed, and the scene can ultimately be rendered with a camera. Let’s skip into a few examples.
A good one would be interior designers. With their knowledge and cooperation, 3D artists can use 3D rendering extends to create complex scenes of house interiors with various camera angles. This can give customers a realistic rendering of a design before it’s implemented. Let’s see our ArchViz demo, which fits perfectly as an example.
Another related example could be architectural renderings which are, in fact, very fresh field. The ability to rotate, zoom and manipulate of architectural visualization provides the best insight into the project. With such complex projects as buildings and other constructions, this is a significant improvement in light of immersion.
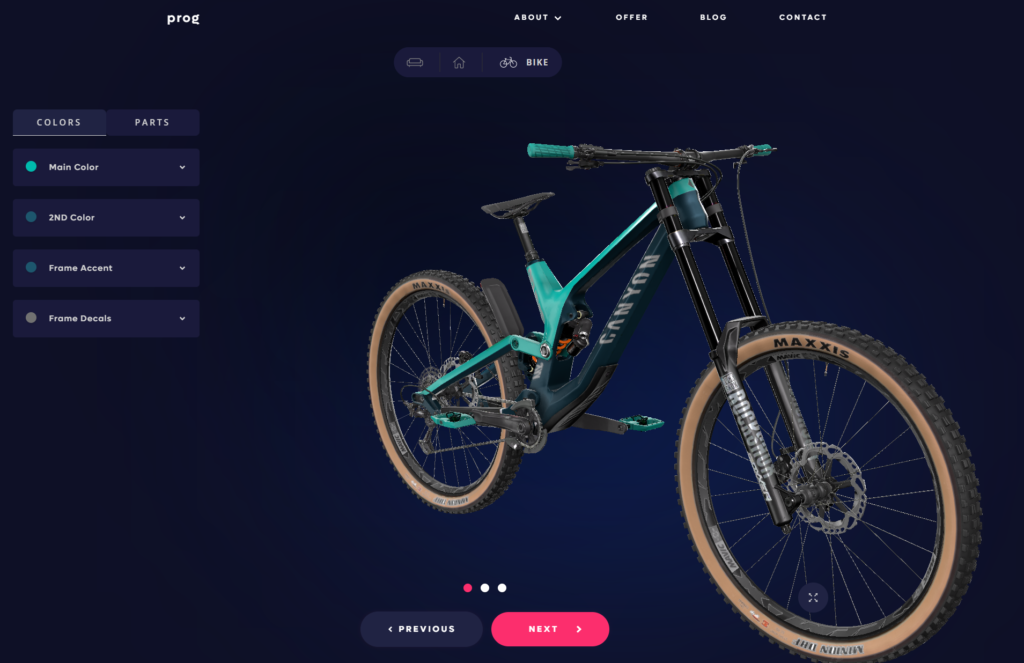
Also, thanks to 3D rendering, a lot of specialists (including architects, game developers, VR specialists and other) can showcase their work online in an engaging way. A good example of presenting a product might be our bicycle configurator – which can be viewed thanks to Unity WebGL.
Worth mentioning is that 3D rendering process can be quite complicated. At least, we have to create realistic images. This is where concepts such as shading, texturing and ray tracing come into play.
- Shading refers to how the color and brightness of a surface changes depending on the lighting properties.
- Texturing, on the other hand, involves overlaying images on objects to create the look of surface details.
- Ray tracing is a technique used to generate an image by tracing the path of light and simulating the way it interacts with virtual objects. It’s highly effective in building photorealistic images, as it can simulate the effect of light on different materials and surfaces.
Tools and libraries for 3D rendering
JavaScript enriched with various libraries and tools allows developers to create photorealistic images. These resources use WebGL – a JavaScript API for rendering interactive 2D & 3D graphics within any compatible web browser and without any plug-ins. Real time rendering is crucial in such cases, especially in the fields like virtual reality or video games, where images need to be rendered quickly as the user interacts with the environment and visual effects plays a big role.
The best-known libraries and tools are:
- Three.js
Basically, this library is one of the most popular. It simplifies the process of working with WebGL enabling you to create animated 2D & 3D graphics without any plugins.
It offers a number of features such as shadows, lens flares and particle systems. In terms of assistance, it also supports various renderers such as WebGL, CSS3D and SVGRenderer. Its extensive documentation and thriving community make it popular choice among devs.
Check our website to see an example of 3D rendering with Three.js.
- Babylon.js
This is an engine that allows developers to create ideal, interactive visuals. Known for its simplicity and powerful features, such as physics engines, animations, collisions and much more. It also supports Virtual Reality devices, including Oculus Rift, HTC Vive and Windows Mixed Reality headsets.
- PlayCanvas
This one is a WebGL-powered graphics engine with a cloud-based editor. It provides real-time collaboration, making it great for team projects. Perfect use of PlayCanvas includes game development as well as 3D applications. It also has an asset server, version control and a one-click publishing feature.
- Unity WebGL
This is a subset of Unity Engine and thanks to it, we can build and export projects and games that run over the web using JavaScript and WebGL (Web Graphics Library) technology. This means that projects can be viewed without downloading or installing other software.
- A-Frame
This is a web framework for creating Virtual Reality experiences. Built on top of Three.js is entity-component based. The cool part is that A-Frame is compatible with most VR headsets and can even work on desktops and smartphones.
- GLSL.js
Library perfect for work with GLSL (OpenGL Shading Language) shaders – allows to create custom effects. It’s particularly useful for devs who want to get to know more strongly with WebGL.
- Whitestorm.js
An open-source JavaScript framework for developing 3D web apps, which provides a simplified way to work with WebGL and integrates with physics & game engines for a more comprehensive development experience.
These tools are really worth mentioning, because all of them have revolutionized the way we approach 3D rendering process in JavaScript. Remember that the choice of library or any tool depends on your specific requirements, that’s why we decided to mention at least a few different.
- Pixel Streaming
We can describe it as a technology that enables us to interact with high-quality, 3D applications (which are detailed) and games from any device, without any need to download or install anything. This is possible by rendering 3D applications on powerful servers and streaming the pixels to the device as a video stream.
Pixel Streaming has the potential to increase significantly the accessibility as well as the quality of 3D applications and games, but remember that it’s essential to keep your eye on the security while using this technology – user inputs and video streams need to be securely transmitted to prevent unauthorized access. However, this technology also has cons, so we, as 3D web app developers, decided to improve it. Thanks to some technical changes, we achieved better performance than possible with Pixel Streaming. You can read more about this case by entering our LinkedIn article about how we improved Pixel Streaming technology.

Using JavaScript for 3D renders with Three.js
Set up the environment
To start developing with Three.js we need to set up our project that we will later deploy to the web. The easiest way would be to create a node.js project with a frontend framework of your choosing.
First, install node.js and initialize the project.
bash
npm init
Now import three js and vite to further configure your project.
bash
# three.js
npm install --save three

# vite
npm install --save-dev vite
Create your HTML file
You should create an index.html file in your project directory with the following structure:
<!DOCTYPE html>
<html>
<head>
   <title>My First 3D Render</title>
   <style>
       body { margin: 0; }
       canvas { display: block; }
   </style>
</head>
<body>
	<script type="module" src="/main.js"></script>
</body>
</html>
From your terminal, run:
bash
npx vite
If everything went well, you’ll see a URL like http://localhost:5173 appear in your terminal, and can open that URL to see your web application. The page will be blank, but now you can create your scene!
Set up your JavaScript file
Let’s create a new JavaScript file called main.js in the root folder of the project (this one you referenced in HTML file) and start by importing Three.js:
import * as THREE from 'three';Now, you can set up the basic components required for 3D rendering – scene, camera and renderer:
// Create a scene
const scene = new THREE.Scene();

// Create a camera
const camera = new THREE.PerspectiveCamera(75, window.innerWidth / window.innerHeight, 0.1, 1000);
camera.position.z = 5;

// Create a WebGL renderer
const renderer = new THREE.WebGLRenderer();
renderer.setSize(window.innerWidth, window.innerHeight);
document.body.appendChild(renderer.domElement);
Create your 3D object
To do that, you need both geometry (a rendered shape we’re building) and material (the appearance of the object). As an example, we can use the simplest idea such as a cube:
// Create a geometry
const geometry = new THREE.BoxGeometry(1, 1, 1);

// Create a material
const material = new THREE.MeshBasicMaterial({color: 0x00ff00});

// Create a mesh (object) using the geometry and material
const cube = new THREE.Mesh(geometry, material);

// Add the cube to the scene
scene.add(cube);
Render the scene
Finally, we can create a render loop and animate the scene:
function animate() {
   requestAnimationFrame(animate);

   // Rotate the cube for animation
   cube.rotation.x += 0.01;
   cube.rotation.y += 0.01;

   // Render the scene with the camera
   renderer.render(scene,

camera);
}
animate();
So this is it. We’ve gone through setting up basic 3D rendering using JavaScript and Three.js. You can explore a lot of possibilities regarding this library to build very interesting complex scenes. Remember to always refer to the official documentation for advanced use cases and keep you browser updated to ensure compatibility with Three.js and WebGL.

Conclusion
Summing up, we can clearly see that the technology of 3D rendering, powered by advanced rendering software, has revolutionized the way we visualize and interact with digital environments and it’s certain that understanding how to use Javascript for rendering process is a skillset that will make you stronger in this branch. You may be a more or less experienced developer looking to add a new dimension to your work – this comprehensive guide surely helped you navigate the complexities and potential of real time rendering.


About prog
Founded in 2016 in Warsaw, Poland. Prographers mission is to help the world put the sofware to work in new ways, through the delivery of custom tailored 3D and web applications to match the needs of the customers.
SIMILAR POSTS
How to Achieve CG Photorealism – Basics & Tips
3D
Design
min. read
Deploying Nginx as an API Gateway – Tips & Functionalities
Programming
Web apps
min. read
8 UI/UX Best Practices for the Successful Performance of the Website
Design
Web apps
min. read
Let's talk
I agree that my data in this form will be sent to [email protected] and will be read by human beings. We will answer you as soon as possible. If you sent this form by mistake or want to remove your data, you can let us know by sending an email to [email protected]. We will never send you any spam or share your data with third parties.
I agree that my data in this form will be sent to [email protected] and will be read by human beings. We will answer you as soon as possible. If you sent this form by mistake or want to remove your data, you can let us know by sending an email to [email protected]. We will never send you any spam or share your data with third parties.