19 December
How to modify a 3D model in Unity 3D at runtime
Programming
min. read
If you’re a Unity 3D developer, you may have found yourself in a situation where you need to modify a 3D model at runtime. This can be a tricky task, but with a little know-how, it’s entirely possible. In this article, we’ll go over the steps you need to take to modify a 3D model at runtime in Unity 3D.
The first step to modify a 3D model in Unity 3D
First, you need to make sure that the 3D model you want to modify is imported into your Unity project. To do this, simply drag and drop the model into the Project tab or import it any other way.
Once your 3D model is imported, you need to create a new script in your Unity project. This script will be used to modify the 3D model at runtime. To create a new script, go to the Assets menu, then choose Create and select C# Script.
Next, you need to attach the script you just created to the 3D model you want to modify. To do this, simply drag the script onto the 3D model in the Hierarchy window.
Now that your script is attached to the 3D model, you can start modifying the model at runtime. This is done using a combination of the Transform class and the Mesh class in Unity.
Simple transformation
The Transform class allows you to move, rotate, and scale the 3D model at runtime, while the Mesh class allows you to manipulate the individual vertices of the model. To move the 3D model, you can use the Translate method of the Transform class. For example, to move the model along the x-axis, you could use the following code:
transform.Translate(1, 0, 0);
To rotate the 3D model, you can use the Rotate method of the Transform class. For example, to rotate the model around the y-axis by 45 degrees, you could use the following code:
transform.Rotate(0, 45, 0);
To scale the 3D model, you can use the Scale method of the Transform class. For example, to double the size of the model along the x-axis, you could use the following code:
transform.Scale(2, 1, 1);But you probably came here to know how you can manipulate vertices. You can do that to modify a 3D model in Unity 3D.
Vertex manipulation to modify a 3D model in Unity 3D
First, let’s address the elephant in the room. You can easily skip using any code at all and you can outsource model animations to animators, who can create something called Skinned Mesh Renderer.
Skinned Mesh Renderers allow your animators to deform the mesh as animation for faces for example and simply import that as an animation, but we can go deeper than that!
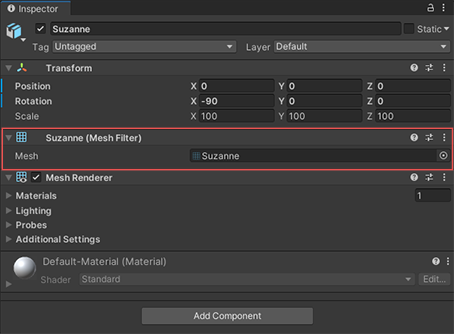
To manipulate the individual vertices of the 3D model, you can use the vertices property of the Mesh class. This property returns an array of Vector3 objects, representing the vertices of the model. You can then modify these vertices to change the shape of the model at runtime.
For example, to stretch the model along the x-axis, you could use the following code:
Mesh mesh = GetComponent<MeshFilter>().mesh;
Vector3[] vertices = mesh.vertices;
for (int i = 0; i < vertices.Length; i++)
{
    vertices[i] = new Vector3(vertices[i].x * 2, vertices[i].y, vertices[i].z);
}
mesh.vertices = vertices;
mesh.RecalculateBounds();
Modifying meshes like that is not the most efficient thing to do, but usually, it’s enough to start working with the system and know if this is something that you want to do yourself or outsource code to the professional team.
Merging meshes for performance
In addition to modifying individual 3D models at runtime, Unity 3D also allows you to merge multiple 3D models into a single mesh. This can be useful for reducing the number of draw calls, which can improve the performance of your game. To merge multiple 3D models into a single mesh, you can use the CombineMeshes method of the Mesh class. This method takes an array of Mesh objects as a parameter and combines them into a single mesh. The resulting mesh can then be assigned to a MeshFilter component on a game object, allowing you to render it in your scene. For example, the following code demonstrates how to merge two 3D models into a single mesh:
Mesh mesh1 = ...;
Mesh mesh2 = ...;

Mesh combinedMesh = new Mesh();
combinedMesh.CombineMeshes(new CombineInstance[] {
    new CombineInstance() { mesh = mesh1 },
    new CombineInstance() { mesh = mesh2 }
});

GameObject.Find("CombinedModel").GetComponent<MeshFilter>().mesh = combinedMesh;
In this code, we first retrieve the Mesh objects for the two 3D models we want to merge. We then create a new Mesh object and use the CombineMeshes method to combine the two meshes into a single mesh. Finally, we assign the combined mesh to the MeshFilter component of a game object, allowing us to render it in the scene. With this technique, you can easily merge multiple 3D models into a single mesh at runtime in Unity 3D.


About prog
Founded in 2016 in Warsaw, Poland. Prographers mission is to help the world put the sofware to work in new ways, through the delivery of custom tailored 3D and web applications to match the needs of the customers.
SIMILAR POSTS
What ROI Will You Have With a 3D Configurator of Your Product?
3D
Business
Design
min. read
Let's talk
I agree that my data in this form will be sent to [email protected] and will be read by human beings. We will answer you as soon as possible. If you sent this form by mistake or want to remove your data, you can let us know by sending an email to [email protected]. We will never send you any spam or share your data with third parties.
I agree that my data in this form will be sent to [email protected] and will be read by human beings. We will answer you as soon as possible. If you sent this form by mistake or want to remove your data, you can let us know by sending an email to [email protected]. We will never send you any spam or share your data with third parties.