6 September
The easiest way to Unit Test with Verify in C#
min. read
A lot of our unit tests are written by asserting against data structures, why not use a tool that does that automatically for us? Verify does just that!
https://github.com/VerifyTests/Verify
Unit Testing with Verify
Let’s start with proper nomenclature so that you can continue your readings after this blog post.
What I’m about to describe is commonly called “Snapshot Testing” or as Wikipedia calls it “Output comparison testing“
Output comparison testing
Creating a display expected output, whether as data comparison of text or screenshots of the UI is sometimes called snapshot testing or Golden Master Testing unlike many other forms of testing, this cannot detect failures automatically and instead requires that a human evaluate the output for inconsistencies.
https://en.wikipedia.org/wiki/Software_testing#Output_comparison_testing
This approach is somewhat common when you start writing your unit or integration/functional tests. As we are not sure at this stage what the output will be when we are writing the test in TTD (Test Driven Development). You can try to assert some fields, and add some null checks, but that is all we can do. The exact result might not be so obvious at the start.
This approach is also useful when writing the tests after the fact of writing a method. That way you can have a simple Unit Test of your code, without much of code, and have them fast.
Starting with Verify
To start your development with the Verify we should head to NuGet packages to download it.
There are 2 main packages. The core library itself and additional nuggets for each major testing framework.
NuGet packages
- https://nuget.org/packages/Verify.Xunit/
- https://nuget.org/packages/Verify.NUnit/
- https://nuget.org/packages/Verify.Expecto/
- https://nuget.org/packages/Verify.MSTest/
In this blog, I will focus on NUnit as this is what we use, but feel free to continue with what you are the most familiar with.
With this post, I will also mention 2 other libraries that might come in handy when writing your unit test cases, with Verify.
Bogus
A lot of our tests in our suit of tests have fields like Name, or Surname or email or even a profile photo. Bogus is a simple fake data generator for .NET languages.
https://github.com/bchavez/Bogus
Fluent Assertions
Fluent assertions is a very extensive set of extension methods that allow you to more naturally specify the expected outcome of a TDD or BDD-style unit test. Code is mutch more readable while this library add some very useful asserts.
First Unit Test with Verify
Let’s consider the following data structure and its usage.
public record Customer(
    string Name,
    string Address,
    string City,
    string State,
    string ZipCode,
    string Country,
    string Phone,
    string Email,
    string CreditCardNumber,
    string CreditCardExpiration,
    string CreditCardCVV,
    string BillingAddress
);
Whew, that’s a big record! You could probably think of at least a dozen more fields that can be part of this record, but let’s stop it here.
Typical Unit Test with Fluent Assertions could look probably something like this.
[Test]
public void Customer_WithAllPropertiesSet_Add_IsValid()
{
    // Arrange
    var customer = new Customer(
        "John Doe",
        "123 Main St",
        "Anytown",
        "CA",
        "12345",
        "USA",
        "555-555-5555",
        "[email protected]",
        "1234567890123456",
        "01/2025",
        "123",
        "123 Main St"
    );

    // Act
    var result = Database.AddToDatabase(customer);

    // Assert
    result.Should().NotBeNull();
    result.Id.Should().NotBeEmpty();
    result.Customer.Name.Should().Be("John Doe");
    result.Customer.Address.Should().Be("123 Main St");
    result.Customer.City.Should().Be("Anytown");
    result.Customer.State.Should().Be("CA");
    result.Customer.ZipCode.Should().Be("12345");
    result.Customer.Country.Should().Be("USA");
    result.Customer.Phone.Should().Be("555-555-5555");
    result.Customer.Email.Should().Be("[email protected]");
    result.Customer.CreditCardNumber.Should().BeNull("credit card number should not be stored");
    result.Customer.CreditCardExpiration.Should().BeNull("credit card number should not be stored");
    result.Customer.CreditCardCVV.Should().BeNull("credit card number should not be stored");
    result.Customer.BillingAddress.Should().Be("123 Main St");
}
That’s a lot of code for such a simple test. To just validate each input field. We could also use
result.Customer.Should().BeEquivalentTo(customer);But then we would have to keep track of each changes to the customer and we would have to make sure that if the tests break in the future are readable to the poor soul that would fix the code.
This code also has a problem with keeping all data static. This is a good thing when it comes to snapshot testing because we do not want to have any differences in our code, between runs. But this doesn’t allow us to actually test if different input values will work.
One step at a time, replace the result with Verify
To improve on our example we can start by replacing the result of our operation with Verify
// other part of our test
// Assert
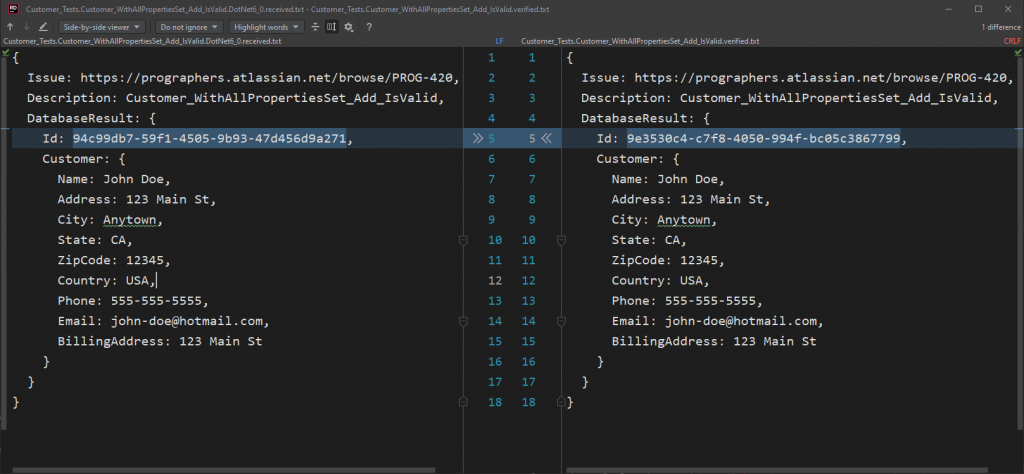
Verifier.Verify(result).ToTask().Wait(); // synchronus veresionawait Verifier.Verify(result); // async versionNow when we will run this code, we will be presented with a 2-way diff window in your editor of choice.
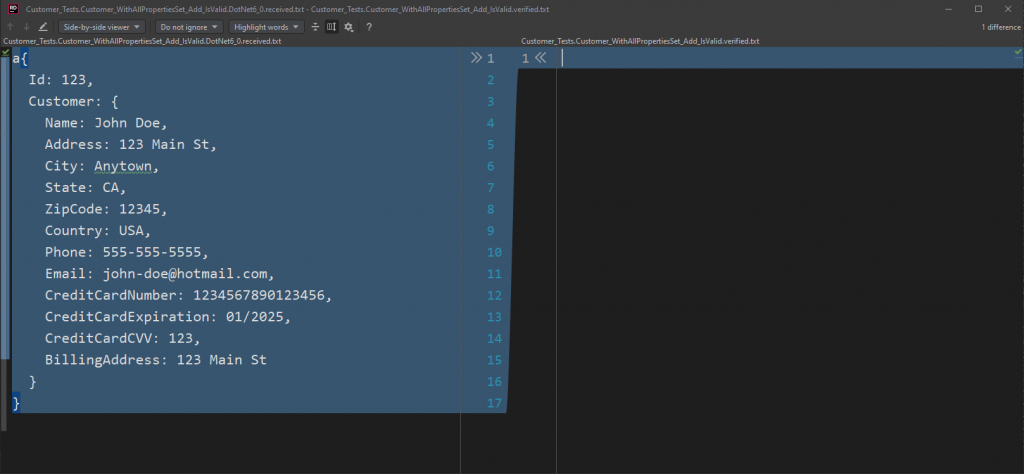
From here we can see the result that we passed to Verifier as a JSON file. This is very useful to compare what changed in the file and where is the issue. The key thing compared to normal tests is that we are able to see the whole context of the error, not only a single line or error.
At this moment there is not much to compare it with, as we need to tell Verify what is the correct result of our test. We can do that by pressing any of the arrows, depending on the way we want to merge these files.
The window on the left shows “Here is what we received from the test” and the window on the right is “expected output”
Let’s accept this result and… Hold on!
Pitfalls of snapshot testing
If you were following along with care you would see that our result contains a credit card number that we said should not be present in the output!
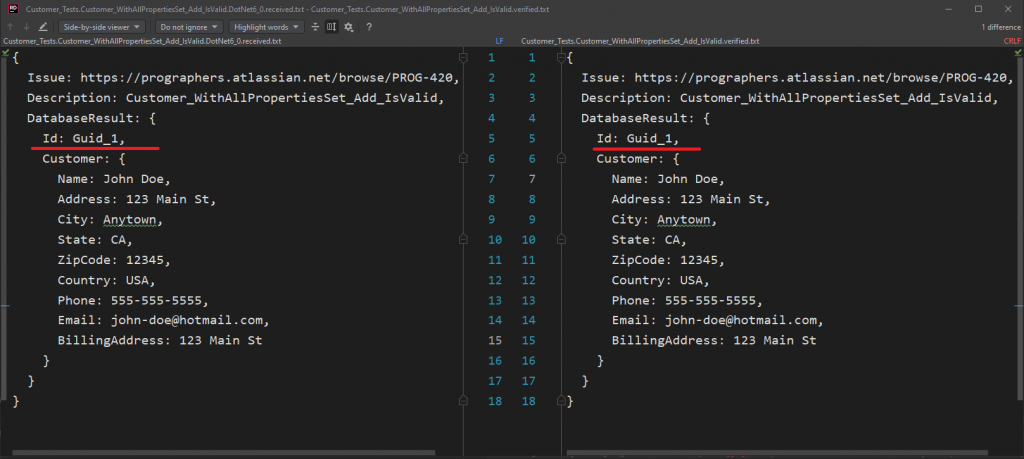
Let’s modify our resulting file to contain only the fields that we want, which means all fields without credit card details.
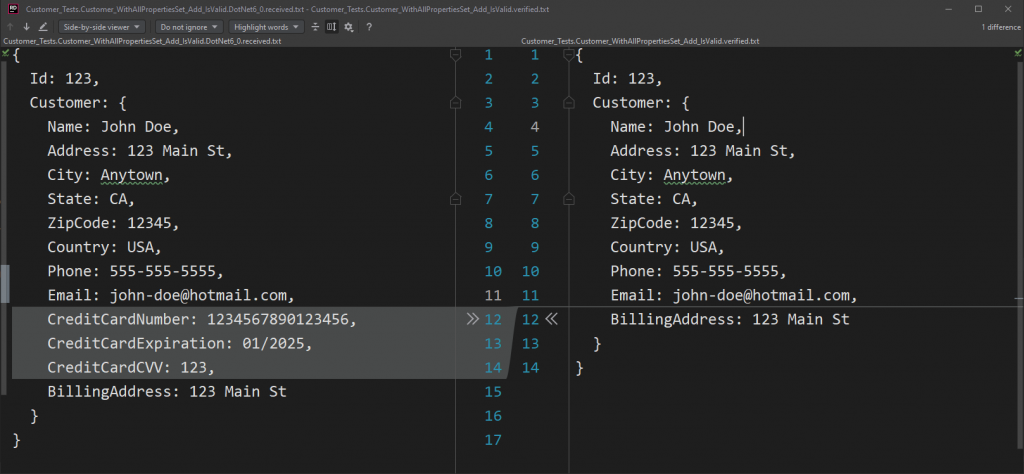
Now we can see clearly where is the issue with our result! We got a Customer with CreditCardNumber but our saved result of the tests says that it should not be there!
When compared to the Fluent Assertions we would see something like
Expected result.Customer.CreditCardNumber to be <null> because credit card number should not be stored, but found "1234567890123456".At this point, I would argue that fluent assertion is somewhat better in that it provides a reason for the credit card expected result. But, that’s not the case. I deliberately included a vague reason for it not being there but it doesn’t include a business reason for this data not to be stored here, nor a functional reason.
In both cases I have valid reasons to ask questions like:
- Why credit card numbers should not be stored in the database?
- Do we have any other endpoint to store this kind of data?
- Do we not store at all these kinds of data? What’s our policy on this?
Of course, if the code would be properly maintained it could have business requirements in the tests or comments but tests are often forgotten, and some poor soul would need to search in the “Done” section of some massive project, why it’s there like that.
The upper hand of Verify
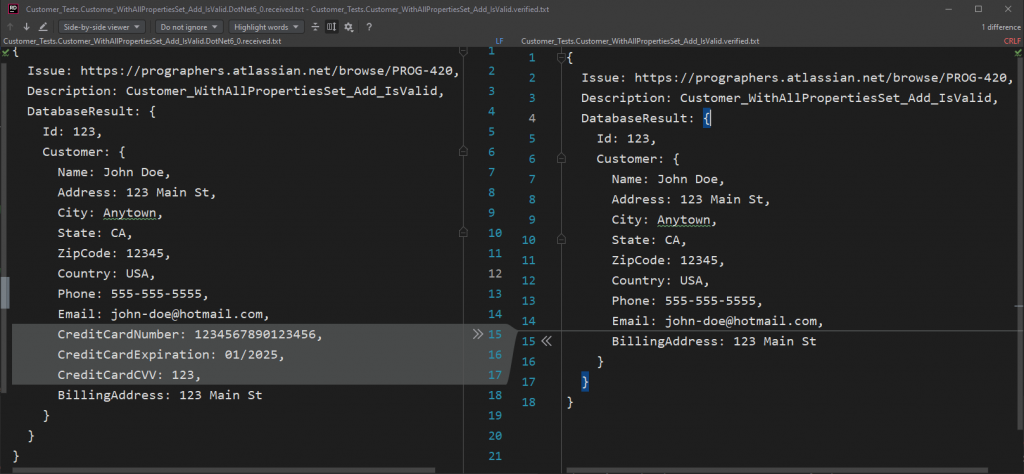
For those business perspectives that we need in the result of the test, Verify has an upper hand. You can return any object or multiple of them. And even name them to store all necessary information, and maintain it as it changes.
To do that just add a new anonymous object as a result and viola!
await Verifier.Verify(new {
   Issue = "https://prographers.atlassian.net/browse/PROG-420",
   DatabaseResult = result,
   HttpResult = httpResult,
   HttpRequest = httpRequest
});
Verify will happily convert this into JSON for you and display it in very user-friendly when your tests will fail!
Scrubbers
Verify has one more feature that will come in handy before we will refactor the data creation of our tests. Those are scrubbers.
A lot of times our data will not be in this pure static form, especially when we are dealing with integration testing and the database has for example GUID as its Primary ID. Or we timestamp the data.
For the rescue come scrubbers. Those will remove all instances of randomness from our snapshots! By default, Verify have just a handful of scrubbers. That is for GUID, DateTime, and a few others. Those are applied by default to the scrubber so you do not have to worry about random GUIDs in your responses.
Custom scrubbers
You can write your own scrubbers as well, for example here is one we made for MongoDB that takes care of BsonObjectIDs in our data!
List<ObjectId> ids = new();
Settings.ScrubLinesWithReplace(s =>
{
    if (ObjectId.TryParse(s, out var id))
    {
        var indexOf = ids.IndexOf(id);
        if (indexOf != -1)
        {
            return "objectId-" + indexOf;
        }
        ids.Add(id);
        return "objectId-" + (ids.Count - 1);
    }

    return s;
});
Verify files
Verify produces 2 files for each test.
*.recieved.txt and *.verified.txt.
*.recieved.txt should disappear a few seconds after the test, but just in case you should add it into git ignore to not spam your repository with temporary files.
*.verified.txt should be shared and committed to your repository. As this is a basis for your tests!
By default, they are created in the directory where *.cs file is that runt his test, but you can add it somewhere else with VerifySettings, as follows.
var settings = new VerifySettings();
settings.UseDirectory("VerifyResults");
await Verifier.Verify(result, settings);
Not that they will put them into their own separate folder.
Summary
Because this article turned out longer than I expected, come back for round 2 where we will use Bogus to improve upon our tests, even more, to handle more use cases!


About prog
Founded in 2016 in Warsaw, Poland. Prographers mission is to help the world put the sofware to work in new ways, through the delivery of custom tailored 3D and web applications to match the needs of the customers.
SIMILAR POSTS
3D Unity Assets: Great Potential for the Success of your Game
3D
Design
min. read
Unity UI Toolkit is better than expected
Programming
min. read
How to run Unity in headless mode
Programming
min. read
Let's talk
I agree that my data in this form will be sent to [email protected] and will be read by human beings. We will answer you as soon as possible. If you sent this form by mistake or want to remove your data, you can let us know by sending an email to [email protected]. We will never send you any spam or share your data with third parties.
I agree that my data in this form will be sent to [email protected] and will be read by human beings. We will answer you as soon as possible. If you sent this form by mistake or want to remove your data, you can let us know by sending an email to [email protected]. We will never send you any spam or share your data with third parties.